Before I start
I'll just tell you that I only recommend items which I have used
and have found to be of excellent quality and what I consider to
be good value for money. I have provided Amazon affiliate links
throughout this article to enable you to purchase any of my
recommendations if you so wish.
I have also included links to
YouTube videos to demonstrate some of the sharpening tools
and techniques.
THE IMPORTANCE
OF KEEPING YOUR KNIVES SHARP
Your knife is arguably your most important tool and keeping its
edge in tip-top condition is paramount to its performance. A
less than sharp knife needs more pressure to cut. You will
expend more energy and you will lose some control as you have to
force the blade ... and that's when accidents happen! I found
that out the hard way when I was a youngster ... many years ago. Keep your
knife sharp at all times and it will give you excellent service.
FROM EXPERIENCE
After a couple of accidental self-inflicted knife wounds as a
kid (one of which was so deep and bled so much that I was
convinced, at that age, I would leak out all of my blood!) I wised up and began to put some kind of
an edge on my sheath knife using my Dad's finest metal file. It
did the trick - of sorts. Over five decades later
I've been through the whole
gamut of knife sharpeners, from cheap crude pull-throughs, whetstones,
diamond stones, leather strops, steels,
ceramics to all-singing all-dancing machines. There are now two
brands which I swear by, depending on where I am:
In my dim
and distant past I have bought and tried cheap (and
not-so-cheap) electric
kitchen knife sharpeners (do NOT waste your money!) and
bench grinders (far too easy to ruin the
edge and shape of your knife).
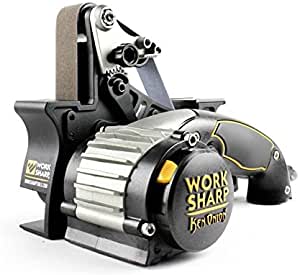
Now, in the comfort
of my home, I do use a machine. Not just any machine, but
the
"Ken Onion WORK SHARP". This is a truly remarkable piece of kit:
an electrically driven, variable speed grinding belt, with
belts going from a coarse P80 grit for poor old knives that
have practically no edge to an extremely fine 6000 grit for
that final polish - don't worry, I'll get into the
importance of grit types shortly. The belts are easy and
quick to change out and the icing on the cake is
that, by a very simple adjustment, you can vary the angle of
grind from 15º to 30º to suit your particular knife.
If you ask any expert knife user what the best value
for money machine they'd recommend is, it's more than a good bet
that the answer would be "Ken Onion".
I have included a couple of cheaper alternatives
towards the bottom of this page for those whose budget
won't run to this fantastic little machine.
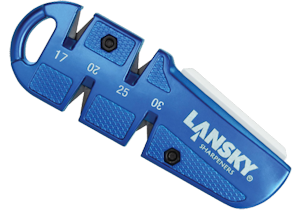
In the field I
use a pocket pull-through made by knife sharpening experts Lansky, the
"Lansky
Quadsharp" (sometimes mis-labelled as the "Lansky PS-MED01 Blademedic").
Another brilliant bit of kit. Four carbide V grooves of
different precise grind angles (17º, 20º, 25º and 30º) to suit any blade, with a built-in ceramic polishing benchstone
for that final finish. I've used a lot of different pull-throughs
over the years, but this one has surpassed all of them and
is now a constant pocket companion.
Lansky have been around for 35 years and their expertise in
producing hand knife sharpening systems is second to none in
my opinion. Before I bought my Ken Onion I used Lansky's
"Deluxe Knife Sharpening System", which stood me in good
stead for years. Although a little time-consuming, it far
outweighed using a whetstone and did an excellent job.
There is one last thing that I carry
as a backup really, and that is a double sided
Diamond stone. This little gizmo is a folding
diamond sharpener (much like a butterfly knife) with 400 grit on one side
and 600 grit on
the reverse. They are very inexpensive and seem to last a long time. My last one
was still going strong after two years before it went
AWOL.
Iin the field I always place a few drops of water on the
surface of the sharpener to float away the metal
shavings. I've even used spit on occasions. Always give
a few strokes to both sides of your blade edge with the
400 grit before changing over to the 600 grit. Of
course, it takes a little practice to achieve the
correct grind angle, but you'll get there.
Of course, being cheap this sharpener isn't going to
last forever, so swap it for a new one as soon as you
find its efficiency beginning to drop - but that's not
going to break the bank.
GRITS
Apart from cheap
whetstones, sharpeners come in a variety of grits. Basically,
the lower the grit number the coarser the surface of the
sharpener and the faster it will remove metal. Different people
have different thoughts on which grit size to use for what task,
but here are my own recommendations:
120 - 600
(coarse grits) are for quickly repairing dull or chipped blade or re-shaping the blade bevel-angle.
As I said: the coarser the stone, the quicker the process and
this range will eliminate chips in your edge quickly.
800 - 2000
grits are ideal for resharpening a blade which has started
to become a little dull
3000 and higher
are for final polishing of your bevel.
TYPES OF KNIFE
SHARPENERS
There are four
basic types of blade sharpeners:
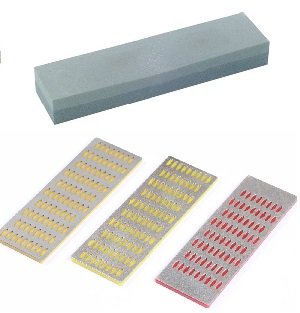
SHARPENING
STONES - (often referred to as "Whetstones",
whet meaning “to sharpen”) These stones come in a
variety of shapes and sizes, but are all basically flat, rectangular blocks, with each type having
its own characteristics. Stones are made using both natural and synthetic materials. There
are three types of knife sharpening stones:
Oil stones - so-called
because you need to oil them with a "honing oil"
before beginning to sharpen. The oil acts to float
away the removed metal particles, so they don't clog
up the surface of the stone. These are the slowest
sharpeners of the three.
Water stones - similar to
oil stones, but these need to be soaked in water for
a few minutes before commencing sharpening.
Diamond stones - have a
metal plate, the surface of which is covered in
bonded fine synthetic diamonds. These are by far the
fastest sharpening stones of the three.
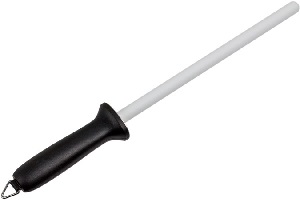
SHARPENING/HONING
RODS - (popularly know as "Steels") These
are not sharpeners, but rather used for honing an
already reasonable sharp edge. Traditional steels have
longitudinal serrations down the length of their
hardened steel shaft and you hone your bevel by drawing
your blade over the length of that shaft. You may have
seen butchers using these and there's quite a knack to
using one properly and ideal for putting a fine edge on
a large carving knife before attacking your roast
chicken. Other variations are made using ceramic instead
of steel, which is a much finer honing material.
PULL
THROUGHS - These are generally hand-held devices
which have two pieces of tungsten carbide steel arranged
in a "V" shape, through which you draw your blade. As
you pull your knife through, the tungsten cutting edged
remove metal from your bevel. The angle of the V is
fixed, so that you always achieve the same bevel angle.
Sounds good so far, but if it's a cheaper variety or you
place too much downward force on the blade you will find
the edge of you blade has uneven micro serrations along
its edge.
The better ones include an additional
V made of two ceramic rods, which will produce a final
polished edge. The one on the right is the
"Lansky Blademedic", which is a little cheaper than the
"Lansky Quad" I
mentioned earlier. It has one tungsten and one ceramic
V, plus a diamond tapered rod for fast reconditioning and maintenance
and a ceramic edge for sharpening serrated blades. If
money is a little tight, then this is an excellent
replacement for the "Quad".
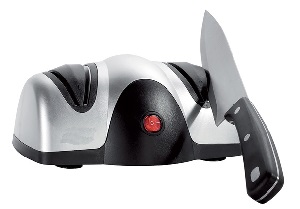
ELECTRIC
- Most of the electric sharpeners on the market are
similar to the one on the right. They consist of an
electric motor which spins circular grinding stones and
have angled slots for the blade to make contact with the
spinning stones.
They are sold as kitchen knife sharpeners and vary
enormously in price but are, at best, pretty inferior
beasts. For starters, their motors are generally
significantly underpowered so that, as soon as you
introduce the blade into the slot and make contact with
the revolving stone inside, the machine slows right
down. They often come with different slots for coarse
and fine grinding and one for scissors, but I have never
found one that does anything like a reasonable job and
they usually leave you with a rough and uneven edge.
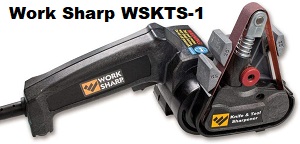
The best electric sharpeners (from my own
experience) are belt
types, as in the
"Ken Onion WORK SHARP" already mentioned.
There is a significantly cheaper version, called the
"Ken Onion
Work Sharp WSKTS-1". This is also an excellent machine
but does not allow you to change the grind angle
(set at 25°) - but it does have a 65° angle
for scissors and shears. That said, it is entirely
possible to make angled shims to fit over the guides to
achieve your desired bevel angle (and save yourself a
few quid).
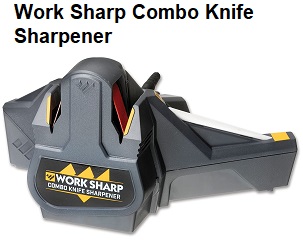
Cheaper still is the
"Ken Onion Combo Knife Sharpener". This little champ will
give you a solid grind angle of 25° every time with the
minimum of fuss and includes a Tapered Ceramic Rod that will hone every knife you own to a razor-sharp edge.
The Combo Sharpener uses a ½” x 10″ premium 3M™ abrasive belt – engineered for cool sharpening and long life. The abrasive is designed and intended for metal grinding applications and will sharpen any type of blade steel without over-heating your blade.